A stud wall for bioethanol fires
Learn how to build a sturdy stud wall for your bioethanol fireplace with step-by-step instructions and a list of materials.
Please note: in this project we utilized an older Bio Container model. In order to build a fake chimney breast using one of our Ribbon Flame Regulating Bio Containers (measuring 75cm or 50cm), please consult the PDF brochures for the necessary safety distances. You can access these brochures from the Download tabs on respective product pages.
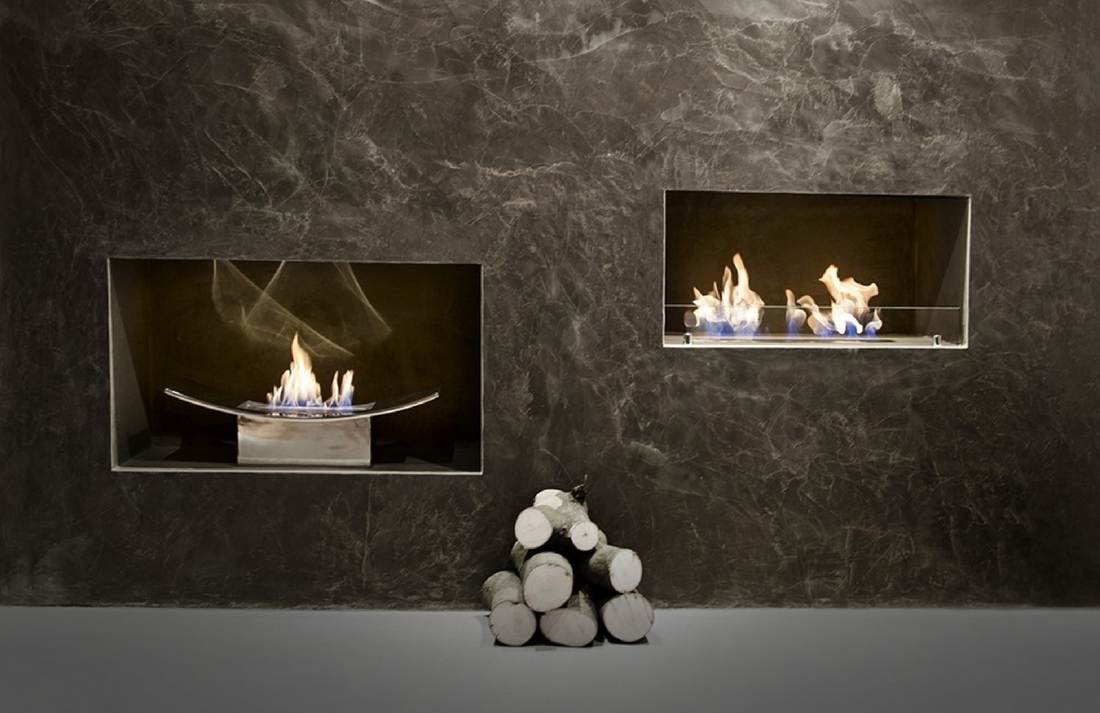
As we were redesigning our Central London showroom, we planned and constructed a fake wall to house the Large Bio Container and Zen-Bio Fire in fireproof openings. We wanted to create a sleek, modern look with an artistic finish that would go well with a ribbon flame in one opening and a stylish built-in firebox for a second fireplace. We imagined that the hole-in-wall on the left would suit our luxury mirrored stainless steel Zen Fire very well. However, it also ended up displaying our elegant glass Gravity Flame really beautifully. The whole build took several days for our hired builder with a helper. We are very happy with the final result.
STEP 1
We first planned, measured, and constructed the basic structure made of timber. It was like creating a frame for another wall built on top of the existing wall. We made openings where we would later add extra support for the burners and line them with fireproof materials.

STEP 2
Before continuing with the work on the openings, we measured and cut the plasterboard panels for the front to the required sizes. Then we temporarily fixed the panels against the timber frame. We did this to check the dimensions of the openings and to ensure we would get the look we wanted.
STEP 3
When creating the opening for your fire, the most important point to consider is that the opening has to be lined with completely heatproof and fireproof material. For example you can use stone, slate, metal, brick cement, or vermiculite board. We used vermiculite boards to ensure extra protection in the area where the flame produces a lot of heat. Additionally, we cladded the openings with fireproof cement.

Vermiculite Board
Vermiculite is a naturally occurring aluminum-magnesium silicate mineral, non-toxic and environmentally friendly. It can be worked easily with woodworking tools. It can be sawn, drilled, and sanded.

Vermiculite boards provide fire resistance, insulation, and thermal stability. They withstand extremely high temperatures and you can use them to cover fireplaces, line openings for wood burners, stoves, heaters, and other heat-producing appliance.
If you decide to line your fireplace opening with vermiculite boards, we highly recommend the Vitcas shop. They specialize in providing refractory and heat-resistant products. We have consulted the Vitcas technical team. After inspecting laboratory data sheets for burning and testing our Bio Container, they confirmed that this board is suitable for lining your opening. You can order the vermiculite board on their website.
STEP 4
In the next step, we cut the slot in the bottom layer of the vermiculite board to house our Large Bioethanol Container. We made sure that the fit was not too tight to allow for extra airflow and expansion of the metal when the container is hot.

STEP 5
We were designing a narrow letterbox line of fire to create a sleek look. Therefore, we planned and constructed extra space at the back for the hot air to flow as the heat would go to the top before entering the room. We covered the whole wooden frame structure with vermiculite boards so that no wood would be exposed in the flame area. We also used a vermiculite board panel to close the opening at the top. Then we cladded the inside of the slot with fireproof cement to ensure extra protection.
If you plan to mount a TV above the fireplace, it's important to cover the top with an additional layer of insulation (such as stone, brick, or steel). This would prevent the heat from rising and damaging the TV. Additionally, you can also use a shelf or a recess to provide further protection for your TV.

STEP 6
In the next step, we made sure that the edges of the openings were straight by lining them with metal netting.

STEP 7
Once we finished and lined the openings, we permanently affixed the vermiculite board panels to the timber frame. Afterward, we applied plaster to the entire surface to create a smooth foundation for the final appearance.

STEP 8
In the final step, we applied polished cement to achieve a stylish look. We designed the left-hand side opening to accommodate different fireplaces. In this picture, we are checking the final look with the Gravity Bio Fire.

And here is our final look – Display wall featurng two fireplaces!
